SQLab en Magura starten samenwerking
THE FIRST “ERGONOMICS GUIDE FOR BRAKE ADJUSTMENT”
Iedere hand is anders en MAGURA is een samenwerking aangegaan met ergonomisch specialist SQlab om een zo goed mogelijke ergonomische en persoonlijke afstellen te bereiken voor haar MT remmen. Het resultaat is een Ergonomische gids die de best mogelijke afstemming voor de remmen in drie stappen garandeert.
Top athletes like Loïc Bruni and Danny MacAskill don’t compromise when it comes to brake adjustment. They know the preferred lever blade position and brake setting that will keep them permanently competitive and give them no problems on the road.
MAGURA has teamed up with the ergonomics specialist SQlab to ensure that every biker can now adjust his brake to hisneeds in the best way possible. The result is an Ergonomics Guide for the best possible adjustment of the brake master and lever blade.
“SQlab has been striving for years to make the interfaces between riders and their bicycles as efficient, comfortable and ergonomic as possible. Our saddles have already proved to be very successful, so now we’re focusing on the point of contact of the hands. The correct lever blade adjustment and our collaboration with MAGURA is the next important step towards more performance and a trouble-free cockpit.”
– Max Holz, SQlab Performance Manager.
HERE’S HOW TO ADJUST YOUR BRAKE TO BEST MEET YOUR REQUIREMENTS:
Positioning the brake master
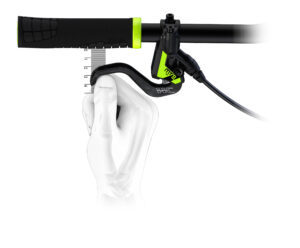
Position your hand on the handlebar grip so that the outer heel of your hand is flush with the end of the handlebar. Now stretch out your index finger in its natural position (approx. 15°) and move the master inwards until the third finger phalanx is lying on the hook at the end of the tip of the lever blade. This method can also be used for for riders who brake with two fingers or middle finger by using the middle finger instead of the index.
Hint: To achieve a really sensitive modulation, MAGURA recommend braking with the third finger phalanx.
A correct hand posture on the brake master avoids overstretching the wrist. The brake can also be operated without difficulty, because you don’t have to change the position of your hand or release the master.
A tip from the pros: Make a note of the centimetres from the end of the handlebar to the brake master!
Positioning the lever blade angle
To determine the lever blade angle, you must use your own saddle to bar drop (the difference between saddle height and handlebar height). It generally helps to adjust the lever blade until it describes the extended line of the forearm.
The nerves that run through the carpal tunnel affect the thumb, index and middle fingers. A too steep or too flat lever blade angle will lead to a kink in the wrist and a narrowing of the carpal tunnel. This in turn leads to numbness and tingling in the thumb, index finger and middle finger.
Reference values for handlebar height & angle of inclination:
> 10 cm handlebar overheight: 20 – 25°
0 – 10 cm handlebar overheight: 25 – 30°
0 – 10 cm saddle overheight: 30 – 35°
< 10 cm saddle overheight: 35 – 45°
Positioning the lever blade
To adjust the reach of your lever blade, first determine your hand size with the reach template. Making the reach too wide can lead to cramping and fatigue of the fingers when braking. Always adjust the reach afterwards at the bite point to match your hand size (S-M-L).
Reach at the bite point:
S: 2 cm – M: 3 cm – L: 4 cm
MAGURA recommends that you re-check the 1st step again after the 3rd step has been completed!
The settings relate to a general basic position. Change the fine adjustment individually where necessary. Important: Make sure that you can grip the lever blade in any situation.
The Ergonomics Guide by MAGURA offers you a simple and effective way to prevent discomfort and increase brake performance.


